

How Much Glow Powder To Use In Resin
Click here to purchase our resin and glow in the dark powder! Glow powder and resin go hand in mitt like peanut butter and jelly. Information technology's extremely easy to make your resin castings glow in the dark and the end result has to exist seen to be believed. This quick guide will give y'all stride past pace instructions on how to create your own glow in the dark resin jewelry, figurines, furniture, etc.
You will need the following supplies for this project:
- Art 'N Glow Resin
- Glow In The Dark Powder
- Plastic measuring cups
- Paper mixing cups
- Wooden craft sticks or toothpicks for mixing
- A mold of your option
- Mold release spray (Amazon link)
- Safety gloves are recommended and profoundly simplify cleanup
- Assorted waterproof sandpaper
- Something waterproof to protect your table from spills (I used wax newspaper)
Prep
Y'all can notice molds at your local craft store, online, or you can choose to cast something you lot have lying around the house. Whatever yous decide to utilise for your mold should be flexible (plastic or silicone typically) and you should keep in mind that it may go destroyed in the process of removing your casting.
Beginning past figuring out how much resin you need to fill the mold. Some molds will tell you the book of resin to use while others will not. If you need to figure out the volume of the mold yourself, effort filling it with water and and then pouring that water into an appropriately sized measuring loving cup. Accept note of the full volume as indicated by the measuring cup and write it downwardly. At present that you know how much casting mixture is required, you can carve up that amount in half and know how much of each part of casting resin will exist required. This assumes you are using a two part resin with equal parts A and B but you tin change up the math if your particular resin calls for different proportions of each liquid.
If yous haven't already, you should at present spray your mold with mold release spray and permit it dry for the recommended amount of fourth dimension. Don't skip this step or yous'll likely ruin your mold and piece when you effort to separate the ii.
At this point you should decide if you want your casting to be a unmarried glow color or if you'd like to use two or more colors for an fifty-fifty cooler effect. We recommend using at least ii colors as it will not only add that extra pop to your concluding piece, simply it has the added benefit of completely eliminating the risk of soft spots in your casting due to the extra mixing step that is required.
For this guide, nosotros'll assume that you are using 2 colors only you can easily employ more or less past adding an extra cup or skipping the 2nd mixing stride that we're about to embrace.
To get started, lay out all of your supplies so that you aren't running effectually looking for them later on. This is important as casting with resin is time sensitive and you'll need to work quickly to get the resin into the mold earlier information technology starts "gelling". Lay out the two plastic measuring cups, a mixing loving cup, wooden mixing sticks, and two or more additional mixing cups if you are using more than than i color.

Getting Started
Starting time by pouring the appropriate amount of each part of the resin into the included plastic measuring cups.

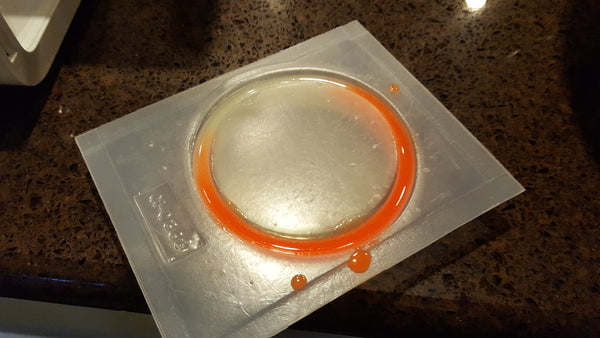
From here, cascade the two parts into your first paper mixing cup and mix them per the instructions on the box. One time thoroughly combined, pour the resin mixture into two different mixing cups in the proportions of each color that you lot want in your final piece. For example, our resin glow bangles are one-half ane colour and half some other so we split up the resin mixture evenly between the 2 mixing cups. If you wanted ¾ of your casting to exist orangish for example, and then you'd cascade ¼ of the mixture into one cup and the balance in the other.


At present you are going to want to weigh the resin in each loving cup and make up one's mind how many grams of resin in that location are. Alternatively, you can use the volume of resin to effigy out the correct corporeality of glow powder to add. The standard ratio to use is 1 part glow pulverization to four parts resin. More or less won't injure anything, but this ratio will get you lot a fantastic glow without wasting boosted powder.
Use this handy formula to get the proportions merely right:
5 x (volume or weight of resin) / 20 = volume or weight of pulverisation to use
For example, if you have 10 grams of resin, the equation would look like this:
5x10g/20= 2.5g of glow powder
If you are using book instead of weight, nothing changes except for the unit (from weight to volume). So if yous take xx milliliters of resin, your equation becomes:
5x20ml/20 = 5ml of glow pulverization
FYI, I similar to use a resin that has a working time of at least thirty minutes so that I have time to finish all of the steps listed above. If your but option is an epoxy or resin that has an fifty-fifty shorter working time, I would do the math and pre measure the glow powder BEFORE mixing the two parts of the resin and starting the curing procedure. Our resin is perfect for projects similar this one due to it'southward 1 to 1 mix ratio and 40 minute working time.
At present it's time to mix the glow powder with the resin mixture. Slowly stir ane colour of powder into the resin mixture in each of the ii mixing cups. Stir slowly and thoroughly to avoid creating bubbling and to make sure that the mixture is completely homogeneous. Don't worry if you lot put too much or too little pulverisation into the resin as these are just guidelines. Yous would have to add A LOT more glow powder earlier you lot acquired whatever bug with the resin's ability to cure.

In one case the 2 colors are mixed, it'due south time to pour them into your mold. Your resin may start to thicken upward a bit which is fine and actually a good thing every bit information technology volition suspend the glow pigment and prevent it from sinking to the bottom of the mold.

Once you've filled the mold nearly to the top, permit it sit for x to 15 minutes and and then come back to it with a tooth pick or other abrupt pointy object. In that location will likely be some bubbles that accept risen to the surface which you will desire to pop before they harden.


Now cover your cosmos to avert dust and bugs getting into it while it's curing and come up back to it afterward information technology has completely hardened. The resin I used for this tutorial had a demold time of 24 to 48 hours so I let information technology sit for a day and a half before removing from the mold. If you are having trouble removing your casting, try sticking it in the freezer for half an hour and so try again. Be patient! It can be a hurting only it should come up out eventually!
Finishing
Yous'll probably demand to practice some sanding to get a nice smooth surface on the part of your casting that was exposed to the air. The best mode to do this is to get a baking sheet, place some waterproof sand paper in it, and put a thin layer of water on top of the sandpaper. Rub the side of the casting that y'all want smooth and flat in a figure viii pattern on the sand paper, turning the slice a quarter plough in your hand every few cycles. The water prevents dust from flying up and the figure 8 pattern ensures that the piece is sanded uniformly!
I started with 80 grit sandpaper and worked my way through 150, 220, 320, and finally 400 grit sandpapers.
To remove sharp edges, get 1 of the finer grits of sand paper moisture and circular the edge by manus. Make certain to use fifty-fifty force per unit area and sand each office equally to avoid creating any raised or lowered areas.
These are the sandpapers I used with great results:
3M Pro Grade Assorted Grit Sand Newspaper (Amazon Link)
3M Assorted Grit Sandpaper (Amazon Link)
Subsequently sanding my project was done and I couldn't exist happier with the results!


Some people have asked me how they can polish their resin for a deep, crystal clear finish and while I haven't done this myself, my inquiry showed that i of the best options to become this event is to use a resin articulate coat spray like this one from Castin' Craft (Amazon Link). Information technology's basically another thin layer of resin that dries glossy instead of matte and is the equivalent of pigment articulate coat only for resin.
There you take it! A glow in the nighttime casting that volition glow all night after a quick charge with 1 of our charging lights. The sun and regular fluorescent lights also practise a great job of charging all of our phosphorescent pigments.
If you institute this blog post at all helpful I'd really appreciate you sharing it on social media then that others can benefit from it just as you accept!
Don't forget to like united states on Facebook and follow us on Instagram @artnglow.

How Much Glow Powder To Use In Resin,
Source: https://www.artnglow.com/blogs/news/how-to-make-a-glow-in-the-dark-resin-casting
Posted by: ferrarifichalfic.blogspot.com
0 Response to "How Much Glow Powder To Use In Resin"
Post a Comment